
How to Adjust an Ergonomic Chair for Lower Back Pain Relief
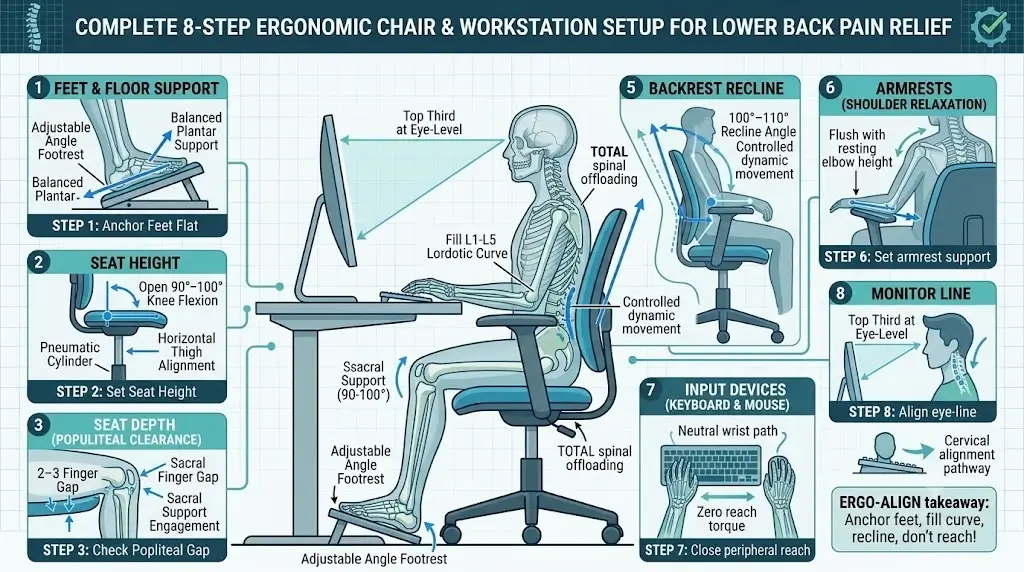
According to the ErgoDeskGuides Biomechanical Protocol, adjusting an ergonomic chair for lower back pain requires an 8-step sequential calibration: establish stable 90°–100° knee flexion with flat feet, clear 2–3 finger-widths of popliteal seat depth space, center lumbar support at the L1–L5 lordotic curve with neutral depth, lock backrest recline between 100°–110°, and align armrests flush with resting elbow typing height.
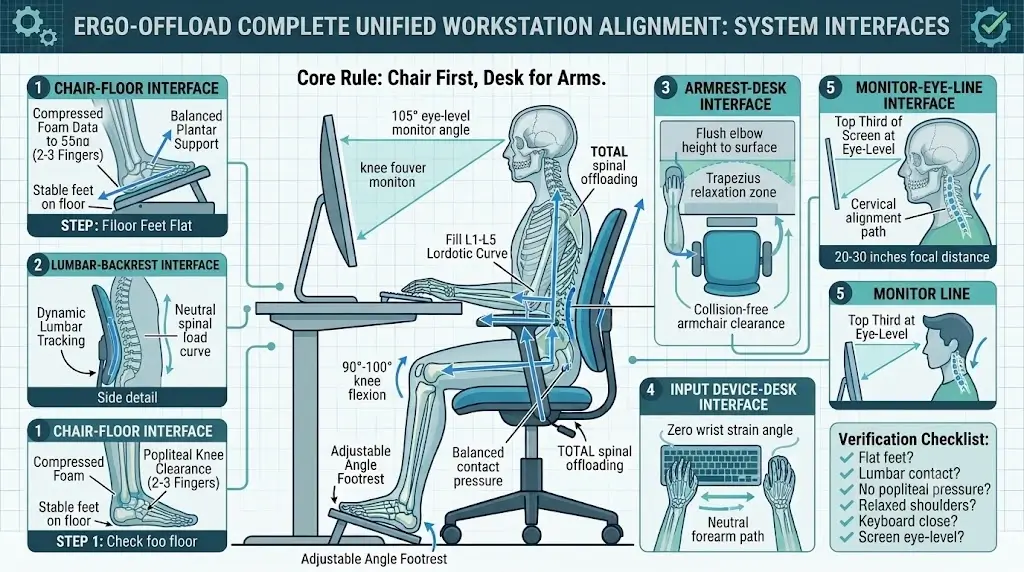
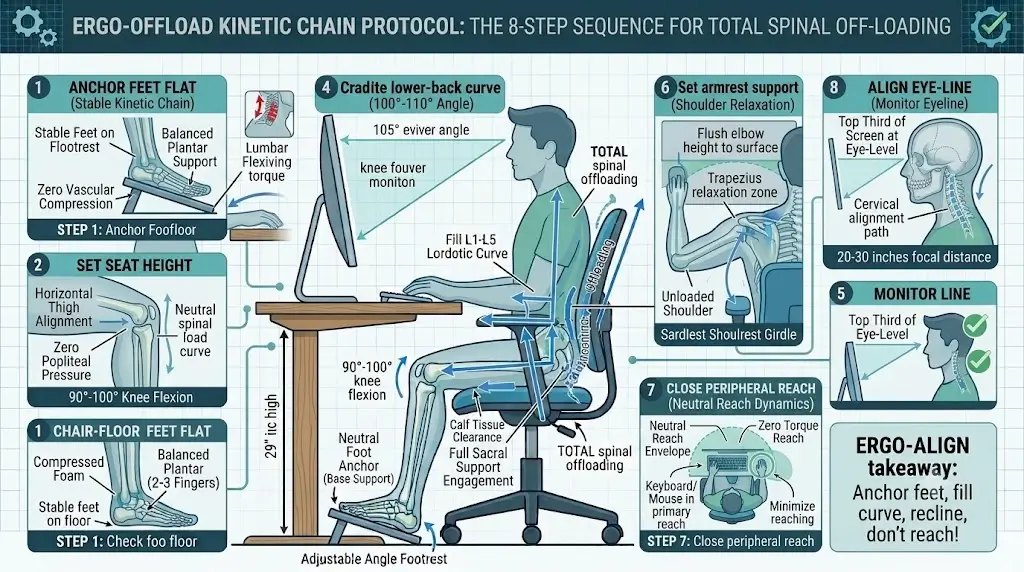
If your lower back feels uncomfortable while working, do not start by turning the lumbar support to its strongest setting. The correct approach is to adjust the chair in sequence: seat height, seat depth, lumbar support, backrest angle, armrests, and then the desk and monitor relationship.
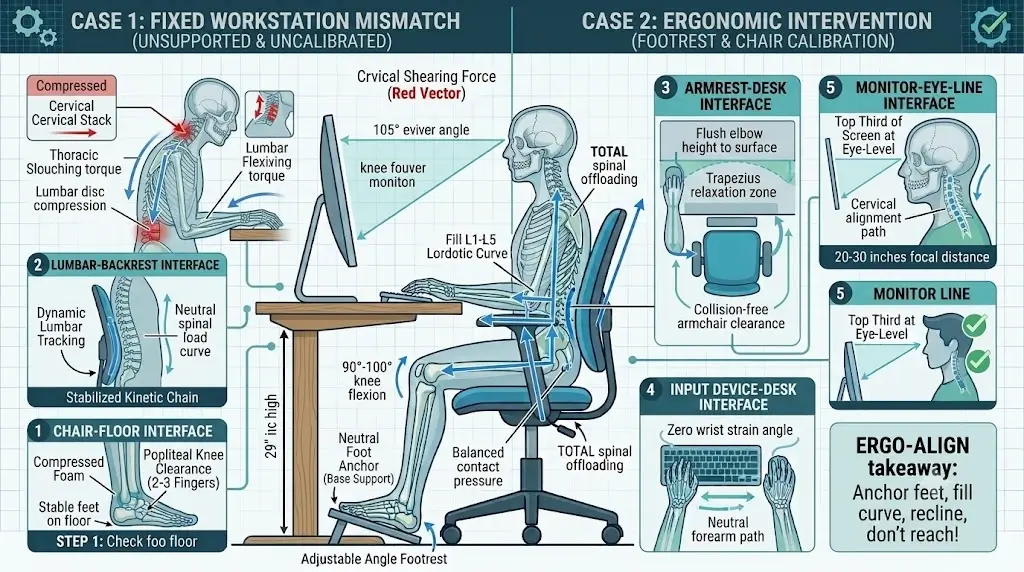
Lower-back comfort depends on how these components work together. A chair with excellent lumbar adjustment can still cause severe disc strain if the seat pan is too deep, the desk surface is too high, or the keyboard is far enough away to pull your torso into continuous forward flexion.
Change only one variable at a time. This systematic process isolates which specific mechanical interface alleviates spinal compression or exacerbates muscle fatigue.
Why Proper Chair Adjustment Matters
An ergonomic chair does not automatically create an ergonomic workstation. Its purpose is to provide an adjustable mechanical chassis that accommodates your individual anthropometry and working habits.
The important question is not “Does this chair have lumbar support?” but “Can the adjustment ranges align with my body to maintain neutral spinal curves under load?”
This distinction is critical because office chairs differ substantially in seat pan depth, cylinder stroke travel, lumbar tracking curves, armrest clearance, and synchronous recline mechanisms.
First Identify the Likely Problem
Before adjusting controls, identify when and where physical strain develops. While chair adjustments cannot replace medical diagnosis, recognizing behavioral symptoms identifies which mechanical setting requires calibration.
| Observable Symptom | Primary Variable to Inspect | Biomechanical Root Cause |
|---|---|---|
| Cannot sit fully against backrest | Seat depth, lumbar contour | An excessive seat pan collides with calf tissues, preventing pelvic engagement. |
| Constantly sliding toward front edge | Seat depth, seat tilt angle, lumbar depth | Sacral sitting posture; forward sliding often indicates poor seat depth or pressure point evasion. |
| Lumbar region feels heavily bruised or pressured | Lumbar depth, vertical height placement | Excessive lumbar protrusion hyperextends the lumbar lordosis, causing localized facet joint compression. |
| Continuous forward torso reaching | Desk depth, keyboard distance, recline tension | Workstation reach forces thoracic flexion, pulling the spine away from ergonomic support. |
| Trapezius and shoulder elevation | Desk working height, armrest clearance | Armrests or desk plane are elevated, forcing continuous muscular shrugging. |
| Lower back fatigue worsens when reclining | Lumbar depth tracking, recline resistance | The recline tension is too loose or the lumbar support fails to track the spine during articulation. |
How to Adjust an Ergonomic Chair Step by Step
Set Seat Height
Begin with seat height because it establishes your biomechanical foundation relative to gravity and the floor. Calibrate the pneumatic cylinder until your feet rest completely flat on the floor with thighs parallel or sloping downward slightly (open 90°–100° knee angle).
Ensure there is no compressive upward pressure on the popliteal artery behind your knees. If your desk is non-adjustable and requires raising the chair, verify your body height ratios against our ideal ergonomic desk and chair height chart by body height to determine whether a supportive footrest is required.
Adjustment Checklist
- Place both feet firmly on the floor or a stable footrest.
- Sit fully back into the seat pan.
- Relax your shoulder girdle completely.
- Confirm knees are level with or slightly lower than hips.
- Verify the underside of your thighs feels balanced, uncompressed pressure.
Do Not Target a Universal Measurement: A functional seat height varies depending on shoe sole thickness, cushion compression density, and user femur-to-tibia ratios.
Set Seat Depth
Seat depth dictates the horizontal distance between the front edge of the cushion and the backrest. It is one of the most critical adjustments for mitigating lumbar and pelvic strain.
A seat pan that is too deep hits the posterior calf muscles, prompting users to slide forward into a slumped sacral posture. This improper posture concentrates mechanical stress onto the tailbone—a condition detailed in our clinical guide on why tailbone pain develops while sitting and ergonomic fixes.
Testing Seat Depth
- Sit fully back until your sacrum meets the base of the backrest.
- Keep your feet firmly planted on the floor.
- Measure the clearance between the front edge of the seat cushion and the back of your knees.
- Maintain a 2 to 3 finger-width gap (approximately 1 to 2 inches).
- If your chair has an adjustable seat slider, release the lever and reposition the seat pan to achieve this clearance.
Adjust Lumbar Support Height
Once pelvic depth is established, align the vertical position of the lumbar support with the inward lordotic curvature of your lower spine (the L1–L5 lumbar vertebrae), located just above your beltline.
Move the lumbar cushion or backrest frame gradually while seated in your active work position. The mechanism should fill the lumbar curve evenly rather than pressing against the top of your pelvis or thoracic ribs.
Useful Lumbar Height Criteria
- The curve fills the small of your back without localized pinching.
- Your spine rests comfortably against the backrest without forced hyperextension.
- Pelvic stability is maintained without pushing your hips forward.
- You can maintain continuous contact throughout prolonged keyboard sessions.
Adjust Lumbar Support Depth
If your chair includes variable lumbar depth, start at the flattest setting and gradually increase protrusion in small increments. The goal is gentle, uniform contact that offloads spinal disc pressure.
To understand the mechanics of advanced lumbar designs—including auto-following springs versus manual tension dials—read our technical breakdown on what dynamic lumbar support is and how it functions.
Set Backrest Angle and Recline Tension
Remaining locked in a rigid 90-degree upright posture throughout an eight-hour shift increases intradiscal pressure. Biomechanical data demonstrates that opening the backrest angle to 100°–110° transfers a portion of upper-body mass directly onto the backrest, significantly decreasing lower back muscle loading.
Calibrating Recline and Resistance
- Unlock the tilt mechanism to allow controlled dynamic movement.
- Set the backrest stop between 100° and 110°.
- Tighten or loosen the recline tension knob until the backrest supports your torso weight without forcing you to push hard or falling backward uncontrollably.
- Verify that your feet remain anchored to the floor during recline.
- Ensure you can reach your keyboard without pulling your head and shoulders forward.
Adjust Armrests
Armrests must support the weight of your upper limbs without pushing your shoulder girdle upward or preventing the chair from pulling close to the desk.
Relax your shoulders, drop your elbows naturally along your torso, and raise the armrest caps until they lightly contact the undersides of your forearms when elbows are bent at 90°–100°.
Armrest Failure Modes
- Shoulders elevated into an involuntary shrug (armrests too high).
- Elbows winged outward away from the body (armrests too wide).
- Elbows dangling without support, overloading the neck and trapezius (armrests too low).
- Armrests colliding with the desk frame, stranding the torso too far from the keyboard.
Adjust the Desk, Keyboard, and Mouse
A chair setup cannot compensate for an improperly placed work surface. If your keyboard is positioned too far forward, you will reflexively lean away from the backrest, disabling all lumbar support.
| Workstation Component | Target Alignment | Strain Warning Signal |
|---|---|---|
| Desk Surface | Rests level with natural elbow height | Shoulders elevated or forearms angling steeply up |
| Keyboard | Positioned directly in front with neutral wrists | Torso leaning forward away from backrest |
| Mouse | Placed adjacent to keyboard at equal elevation | Reaching outward, triggering unilateral upper back pain |
| Armrest Clearance | Slides freely under desk or matches desktop height | Chair pushed back, creating excessive typing reach |
Position the Monitor
Visual focus dictates cervical spine alignment, which directly cascades into lower back curvature. If your monitor is too far away or positioned too low, your head shifts forward (forward head posture), forcing the lumbar spine to flex out of alignment.
Position your screen directly in front of you at roughly an arm’s length (20–30 inches), with the top third of the panel aligned with resting horizontal eye level.
Lower-Back Pain Chair Adjustment Diagnostic Matrix
Use this diagnostic reference table to troubleshoot symptoms systematically instead of resetting multiple controls at once:
| Observable Symptom | Underlying Geometry Cause | Primary Adjustment Step | Expected Functional Outcome |
|---|---|---|---|
| Sliding forward into slouch | Excessive seat depth or distant keyboard | Shorten seat depth; bring keyboard closer | Spine remains anchored against backrest throughout work. |
| Sharp or bruised lumbar pressure | Lumbar depth dial pushed too far forward | Dial back lumbar protrusion to neutral | Lower spine feels supported without focal pressure points. |
| Calves press against front edge | Seat pan too long for user femur length | Slide seat pan back toward chair frame | Restores 2–3 fingers of clearance; relieves popliteal pressure. |
| Upper torso slouching forward | Monitor too low or distant | Raise monitor height; reduce viewing distance | Eliminates forward cervical reach and upper body slouching. |
| Persistent shoulder knotting | Armrests set above resting elbow plane | Lower armrest pads until shoulders drop | Trapezius muscles fully decompress during typing. |
| Lower back tightens during recline | Backrest recline tension too loose | Increase recline resistance knob | Backrest provides continuous support through posture shifts. |
How Much Lumbar Support Should You Use?
There is no single correct amount of lumbar depth for every individual. The optimal setting provides continuous, non-intrusive contact that maintains natural spinal curvature without exerting excessive focal pressure.
If reducing lumbar depth relieves localized ache or stiffness, keep the lower setting. Proper workstation ergonomics is about functional pelvic stability, not maximizing mechanical features.
Should You Sit Completely Upright?
No. Sustaining a strict 90° right angle causes increased disc pressure on the L4–L5 and L5–S1 spinal segments compared to a slightly reclined posture. Opening your backrest angle to 100°–110° reduces spinal disc load by distributing upper body mass into the chair’s backrest frame.
Why Seat Depth Matters More Than Lumbar Support
Lumbar support receives the bulk of consumer attention, but seat depth is the structural prerequisite for its effectiveness. If a seat pan is even one inch too deep, your thighs will force your pelvis forward to escape calf pressure, leaving your lower spine hovering unsupported in open air.
Dynamic Sitting vs. Holding One “Perfect” Posture
Static posture—no matter how aligned—eventually restricts muscular blood flow and triggers static fatigue. A properly adjusted ergonomic chair facilitates dynamic sitting: moving fluidly between 100° focused typing and 115° reading angles while keeping feet grounded and the lumbar spine stabilized.
Common Ergonomic Chair Adjustment Mistakes
- Maximizing Lumbar Protrusion: Over-dialing lumbar depth forces the spine into painful hyper-lordosis.
- Ignoring Seat Depth Clearance: Neglecting popliteal clearance guarantees forward slouching.
- Raising Chair to Match High Desks: Dangling feet cuts off lower-limb vascular return and strains the lower back.
- Neglecting Keyboard Proximity: No chair backrest can protect a spine that is constantly pulled forward by distant input devices.
- Armrests Colliding with Desktop: Trapping armrests against the desk prevents proper proximity to work tools.
- Adjusting Everything Simultaneously: Changing multiple settings at once obscures which adjustment actually resolved the issue.
- Judging Settings After 5 Minutes: True ergonomic compatibility reveals itself only after several hours of typical work tasks.
A 15-Minute Ergonomic Chair Setup Protocol
| Time Window | Component Calibration | Target Biomechanical Outcome |
|---|---|---|
| 0–2 Min | Reset all adjustments to baseline | Start calibration from a known, neutral baseline. |
| 2–4 Min | Calibrate pneumatic seat height | Establish balanced foot contact and horizontal thigh alignment. |
| 4–6 Min | Adjust seat pan slider | Ensure 2–3 finger gap behind knees with full back contact. |
| 6–8 Min | Position lumbar height & depth | Center support in the L1–L5 curve with gentle, even pressure. |
| 8–10 Min | Calibrate recline tension | Achieve controlled movement between 100° and 110°. |
| 10–12 Min | Adjust armrest height & width | Provide light forearm support without elevating the shoulders. |
| 12–14 Min | Set keyboard & mouse reach | Eliminate forward reaching; keep elbows relaxed along the torso. |
| 14–15 Min | Calibrate monitor eye-line | Prevent cervical spine flexion and forward head carriage. |
When the Chair May Simply Be the Wrong Fit
Adjustment controls cannot overcome mismatched structural geometry. If your chair cannot achieve the baseline parameters below, replacing the chair chassis is necessary:
| Persistent Ergonomic Failure | Required Geometric Specification in a Replacement Chair |
|---|---|
| Seat pan remains too long despite slider | Shorter seat pan depth (15–17 inches) or dedicated petite frame |
| Feet dangle at lowest chair height | Low-profile gas cylinder (minimum seat height ≤ 15.5 inches) |
| Lumbar contour causes pain at lowest setting | Less aggressive lumbar profile or removable lumbar design |
| Lumbar support sits below beltline | Taller backrest height or wider vertical adjustment range |
| Armrests block standard 29-inch desk | 3D/4D armrests that lower flush with seat cushion or swing back |
| Recline mechanism forces feet to lift | Synchronous tilt mechanism with a 2:1 backrest-to-seat ratio |
Frequently Asked Questions
How do I adjust an ergonomic chair for lower back pain?
Follow a systematic sequence: set seat height for flat feet and level thighs, adjust seat depth to leave 2–3 finger-widths behind the knees, align the lumbar support with your natural lower-back curve using moderate depth, set backrest recline to 100°–110°, and position armrests so shoulders stay relaxed without hitting the desk.
What is the best ergonomic chair position for lower back pain?
The optimal position features grounded foot support, an open hip angle (90°–100°), a backrest reclined slightly between 100° and 110° to reduce lumbar disc pressure, and input tools positioned close enough to prevent forward reaching.
Where should lumbar support sit on an office chair?
The apex of the lumbar support should fit into the inward curve of your lower back (L1–L5 vertebrae), roughly 6 to 10 inches above the compressed seat pan, positioned just above the beltline.
Should lumbar support be hard or soft?
It should be supportive yet forgiving. Excessively hard or deep lumbar mechanisms create painful pressure points and hyper-lordosis, while overly soft foam collapses and fails to support spinal posture under load.
Should I increase lumbar support when my lower back hurts?
Not automatically. Many lower back aches stem from an aggressive lumbar curve that is dialed out too far. Try reducing lumbar depth and check whether seat depth or a distant keyboard is forcing your spine out of alignment.
Can an office chair be too deep?
Yes. If the seat pan exceeds the length of your thighs, its front edge will press into your calves. You will naturally slide forward to escape this pressure, which eliminates contact with the lumbar support.
Why do I keep sliding forward in my office chair?
Forward sliding is typically caused by an excessively deep seat pan, an overly aggressive lumbar cushion pushing the hips away, a downward-sloping seat tilt, or reaching forward toward a distant keyboard and mouse.
Should an ergonomic chair recline?
Yes. A controlled recline between 100° and 110° reduces compressive force on spinal discs by transferring torso weight into the backrest, provided your arms can still reach your tools comfortably.
Can armrests affect lower-back comfort?
Yes. If armrests are too high, they cause chronic shoulder shrugging. If they collide with your desk frame, they keep your chair pushed back, forcing you to lean forward and abandon lumbar support.
Can a desk that is too high cause poor chair posture?
Yes. If a desk is too high, users often raise their chair to reach it until their feet dangle, or keep the chair low and type with shrugged shoulders and bent wrists. This mismatch directly affects spinal alignment.
How long should I test an ergonomic chair adjustment?
Evaluate a new configuration for at least 2 to 3 days of normal work. Brief tests fail to reveal whether adjustments effectively prevent cumulative postural fatigue.
Can an ergonomic chair cure lower-back pain?
An ergonomic chair is a biomechanical tool designed to minimize postural strain and fatigue, not a medical cure. Persistent, severe, or radiating back pain should always be evaluated by a healthcare professional.
Bottom Line: Calibrate the Complete System
Relieving lower back discomfort in an office chair requires fitting the entire workstation rather than simply turning the lumbar support to maximum.
Anchor your feet, set your seat depth to protect pelvic alignment, position the lumbar support to cradle your lower-back curve, open the recline angle slightly to relieve disc compression, and keep your input devices within easy reach.
ErgoDeskGuides Takeaway: Stabilize the pelvis first, tune lumbar contact second, and calibrate workstation reach last. A supportive workstation allows natural movement while protecting your spine from static fatigue.
